How to Make A Photo With Color and Black and White

You have probably seen one of these dramatic looking images and wondered how it was created. It is a clever and imaginative way to draw attention to a particular color or section of an image and give it that artistic look and feel. The coolest part about these stylish images is that you don't have to be a photo editing expert to make one of your own. The process of making a photo that combines black and white with color can be broken down into three easy steps:
- Select the area you want to color
- Invert the selection
- Apply the Grayscale filter
After reading this tutorial, you too will be able to create an attractive image of your own using the latest version of PhotoPad photo editing software.
Making A Selection
The first step will be to select the part of your image that you wish to keep in color. PhotoPad features 6 different tools for making selections and they each have their own benefits. |
| PhotoPad has six different selection tools |
 |
| Select a region along its outline |
Selecting With The Magnet Tool
The Magnet tool is the tool that is best suited for this project. The Magnet tool works by finding the edges on the object you are selecting. The tool looks for the abrupt color change that is typical of the edge of an object against a background and then uses those detected edges to make an incredibly precise selection. |
| Select a region with similar colors |
Selecting With The Wand Tool
The Wand tool is another perfectly acceptable option. The wand tool uses color detection to make a selection. You can adjust the sensitivity of the tool so that it selects more or less colors on the spectrum of color you are trying to select. Hold down the shift key while making your selection to add more to it. The Wand tool works best when the background is a different color than the object you are selecting and when the object you are selecting doesn't consist of too many different color tones.Inverting A Selection
I used the Magnet select tool to select the petals around this flower. You want to make sure you zoom in close to ensure that you are making your selection as precise as possible.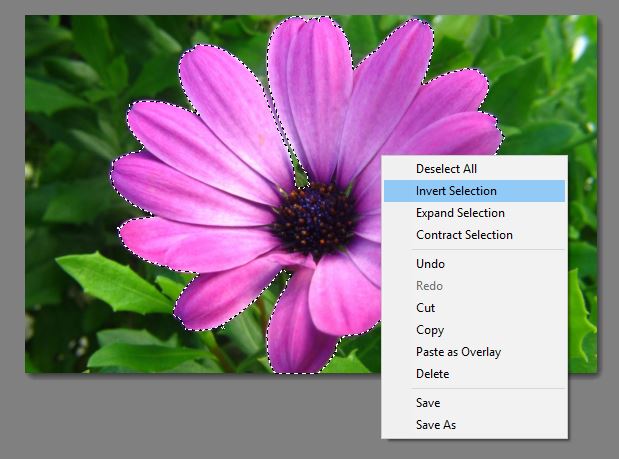
With your object still selected, right click on the selection and choose the option on the drop down menu that says "Invert Selection." You will notice that now, instead of our flower being selected, everything EXCEPT the flower is selected. That is just what we want.
Using The Grayscale Filter

 With our background selected, we are going to visit the Filters tab, which is located at the top of the PhotoPad application. Click on the Filters tab and then look for the Grayscale filter on the far left. Grayscale means that only shades of gray will be used to color your image. It is more commonly referred to as "black & white." Now, click on the Grayscale filter option.
Because we have something selected, this will launch a prompt asking if we want to apply the Grayscale effect to the entire image or just to the selected region. Because we now have just the background selected, we will choose to apply the effect to the Selected Region.
The Finished Product
As you can see in this image, the Grayscale Filter effect has been applied to the background while leaving the balloons and their bright colors untouched. The finished product is a beautiful image that jumps right out at you.


